

TL;DR
Introducing a new, easy to use, Drupal 8 module for background images: https://www.drupal.org/project/background_image
If your site is designed around utilizing background images, then this module is for you! Whether you need a surgical implementation that only administrators/developers can implement or provide the ability to allow users to attach their own background images to entities, this module has you covered.
If you're just looking on how to setup this module, you can skip ahead to the Installation section.
The Problem
Over the past month, I have attempted to solve a lot of problems in regards to displaying a user provided image (via Drupal's UI) on a rendered page in the form of background-image: url(...);) in Drupal 8.
In Drupal 7, there were several modules that attempted to do just that. However, much of time, it was simply easier to implement an entirely custom solution. While this did take some effort to do it just right (using custom image fields and then preprocessing via a sub-theme), it was relatively easy enough to accomplish if you knew what needed to be done.
Now, you may be thinking "Great another module that does the same as another module, but only slightly different." You would be kind of right, but it's actually quite a bit different than any previous implementation.
In Drupal 7, many of the "solutions" were primarily focused on using custom field types or field formatters. This required the same type of field or formatter settings to be applied to every single entity/bundle you needed this functionality on. It was still time consuming to implement in a consistent fashion across all the moving parts (which is why a custom implementation was often easier).
A solution in Drupal 8 can now be implemented in an entirely different way. One that eases the setup process and also brings an easier to use interface for your users.
Need Drupal 8 Development?
Tag1's backend and frontend Engineers are among the top contributors worldwide to Drupal 8’s code-base.
Responsibility
I think one of the biggest challenges with this entire topic has always been "Whose responsibility is it to handle the UI and then output of said background image?" In the past, there has never really been a clear delineation of whether this responsibility specifically fell to a module or to a theme. Sure, in Drupal 7, some of the modules used fields, but often times you still had to customize the output (usually in a theme) given your specific needs.
In Drupal 8, themes now have very limited "power" in what hooks and plugins they are actually allowed to participate in. This inherently and dramatically forces the responsibility toward needing a dedicated module to handle all of the intricacies required for properly displaying a background image provided by a user.
Entities
Drupal 8 brought with it many great and wonderful things, the least of which is being able to create new entities (out-of-the-box) in a very easy to implement way. No need to depend on a contrib module or figure out complex database schemas. Core just handles the bulk of what you need if you just configure it right.
This module implements a truly dedicated entity. No more blanket custom "Background Image" node bundle entities. No new fields. No field formatters. No more wasting precious time.
This major difference is the primary reason behind creating an entirely new module and not attempting to "port" an existing one. Never mind the added inherit benefits of being able to do things like entity specific permissions.
Cacheability
As mentioned above, often times it was simply easier to implement custom solutions in Drupal 7. This usually meant going in the theme and preprocessing what you needed. However, gone are the days that simple "theme hacks" in the preprocess layer can accomplish what they used to.
Many of those "easier solutions" in Drupal 7 are simply and naturally hindered by the much needed and massive improvement to the cacheability layer in Drupal 8. Thus, themes can no longer inject a background image (on a page level) by simply retrieving the "image field" value for the current page's entity (node) object. Render cache will just "stick" to whatever image value was requested first.
This can be a big "gotcha" for Drupal 8 beginners. They aren't aware of the powerful caching layer that's used by default in Drupal. The exact reasons behind why this happens is extremely complex, but suffice it to say: there is no context for the specific entity's image at a page rendering level.
Sure, one could simply add the specific entity's cache context to the page, but then you would be rendering/caching every single entity (variation). That is not a good solution and actually defeats the entire purpose of (render) caching. This is where implementing a dedicated entity in Drupal 8 is extremely powerful: entities are also a separate cacheable object.
Optimization
Another beautiful feature of Drupal 8 are the two newly added modules: Breakpoint and Responsive Image. I wanted to take advantage of both of these (not required, but highly recommended) to optimize a background image even further; especially when dealing with 2x multipliers for retina displays.
However, doing so in regards to background-image: url(...); would mean that there would be a need to generate custom CSS for each and every image to account for the responsive media queries. CSS generation in Drupal has typically been string concatenations, but that's a lot of strings to ensure everything is "just right".
Cut to... Twig! Drupal 8 also already comes with Twig and it felt like a natural approach when needing to generate the multitude of rules without also adding a preprocessor requirement (which has always been a highly debated topic).
Note: if you enable the Advanced CSS/JS Aggregation module, this generated CSS will also be minified when the site's CSS is being preprocessed.
By using a .css.twig template, generating each media query rule was actually quite a delight to implement:
{# Media Queries #}
{% for media in media_queries %}
@media {{ media.query }} {
  .{{ background_image_class }}::after {
    background-image: url("{{ media.url }}");
  }
}
{% endfor %}
Obviously, generating this CSS each time would be a huge resource drain, especially when an image or its settings change. First, I attempted to use core's \Drupal\Core\Asset\AssetDumper. Storing it in this fashion seemed to be OK, but I soon realized that to get the actual CSS filename meant I had to generate the file right away. This caused issues with having to wait for the initial page response (think BigPipe).
Instead, I took a page from core's own image styles playbook and decided to generate this CSS only upon an actual CSS resource request from the browser. If it didn't actually exist at the specified location it would then, and only then, generate it on the fly.
Currently, this generated CSS can be regenerated upon a sitewide cache rebuild. There are plans to optimize this even further by providing a way in the administrative UI to clear only these generated files.
Preload Image/Color
While media queries certainly help reduce the unnecessary loading of a massive image on a small device, it doesn't help with network latency and what seems to be FOUC. This problem can be even more drastic when the page is using a dark image/style and you have a white background, waiting for the image to load.
Sites like Medium use various techniques to optimize the display of images. One of their solutions is easily doable in Drupal considering it comes standard with image styles: generate an extremely tiny version of the image, preload it and then use it as the initial background image. Since image styles' foundation utilizes \Drupal\Core\ImageToolkit\ImageToolkitInterface, we can also extract the average "color" of the image by resizing it all the way down to a 1x1 image.
This means that what an end user visually sees, depending on network latency, is done so in a very progressive manner:
- Average background color that resembles the image
- Preload image (100 x 67) low quality/blurred version of the image
- Fallback (mobile) image, normal quality
- Hi-resolution image
Inheritability
Depending on a site's design, there is often a need to "inherit" an image or its settings based on various conditions. For some sites (like this one), a "global" background image is needed. For others, individual entities need there own images/settings (see the various blog posts here). There are several "types" of background images supported by this module, with even more planned:
- Global
- Entity Bundle
- Entity
- View
- Routes or Paths (or both, planned)
The background image types above are listed in order of how they are inherited. Each background image provides the ability to inherit or override an image or individual settings entirely. This allows for true customization without the "all or nothing" approach in previous Drupal 7 implementations.
Extensibility
Sometimes your specific "needs" aren't met by what you get "out-of-the-box" by a module. In the case of a background image, you may need to programmatically add additional information to the overlay text.
An example of this can be found at the top of this page where the "Author's information" is added to the background image overlay text (so it also displays when the image is using the full viewport setting). This can easily be accomplished using one of the many alter hooks this module provides:
<?php
/**
 * Implements hook_background_image_text_build_alter().
 *
 * {@inheritdoc}
 */
function MODULE_background_image_text_build_alter(array &$element, array &$context) {
  /** @var \Drupal\node\NodeInterface $entity */
  $entity = $context['entity'];

  /** @var \Drupal\Core\Datetime\DateFormatterInterface $date_formatter */
  $date_formatter = \Drupal::service('date.formatter');

  /** @var \Drupal\Core\Render\RendererInterface $renderer */
  $renderer = \Drupal::service('renderer');

  // Immediately return if this is not a blog post.
  $entity_type = $entity ? $entity->getEntityTypeId() : FALSE;
  $bundle = $entity ? $entity->bundle() : FALSE;
  if (!$entity || $entity_type !== 'node' || $bundle !== 'blog') {
    return;
  }

  // Retrieve the blog author and the time the blog post was created.
  $user = $entity->getOwner();
  $created = $entity->getCreatedTime();

  // Retrieve the user profile picture by using the "compact" view mode.
  $picture = \Drupal::entityTypeManager()->getViewBuilder('user')->view($user, 'compact');

  // Bubble the picture's cache metadata to the element.
  $meta = BubbleableMetadata::createFromRenderArray($element)->merge(BubbleableMetadata::createFromRenderArray($picture));
  $meta->applyTo($element);

  // Append the custom user "profile".
  // Note: it isn't recommended to use custom markup like this, however this is being processed
  // via a text formatter and not as a MarkupInterface object, so raw HTML is required.
  $element['#text'] .= '<div class="user-profile">';
  $element['#text'] .= $renderer->render($picture);
  $element['#text'] .= '<div>';
  $element['#text'] .= '<h3 class="name">' . $user->get('field_full_name')->value . '</h3>';
  $element['#text'] .= '<h4 class="title">' . $user->get('field_job_title')->value . '</h4>';
  $element['#text'] .= '<time class="date" datetime="' . $date_formatter->format($created, 'custom', 'c') . '">' . $date_formatter->format($created, 'custom', 'F d, Y') . '</time>';
  $element['#text'] .= '</div></div>';
}
Installation
You can download and install this module from https://www.drupal.org/project/background_image. Once installed, there are a few steps you will have to do before it will actually work.
Recommended Modules:
The following are a list of additional modules that you may find useful when working with this module:
- Advanced CSS/JS Aggregation - Useful for minimizing the generated CSS for each background image.
- ImageMagick - Useful in cases where PHP memory limits bug out due to large image processing.
- Image Style Quality - Useful for further optimizing the preload background image style quality (recommend configuring somewhere around 30%)
- Image Optimize - Useful for further optimizing all background images (progressive loading)
- Inline Entity Form - Currently a soft dependency if you wish to embed the background image form on other entities.
- Token - Provides a way to view which tokens are available to use when adding overlay text for a background image.
Note: the Background Image module merely provides the "muscle" behind handling background images for a site. While this module does generate CSS, it is merely for the display/positioning logic of the background images themselves. It does not actually stylistically theme the background image or other elements around it or within (like the overlay text).
Note: all subsequent administrative screenshots will be using the Seven admin theme (included with core) and all front-end facing screenshots will be a custom sub-theme of the Drupal Bootstrap base theme.
Step 1: Initial Configuration
- Navigate to
/admin/config/media/background_image/settingson your site and choose which entity bundles you wish to enable support for background images on:
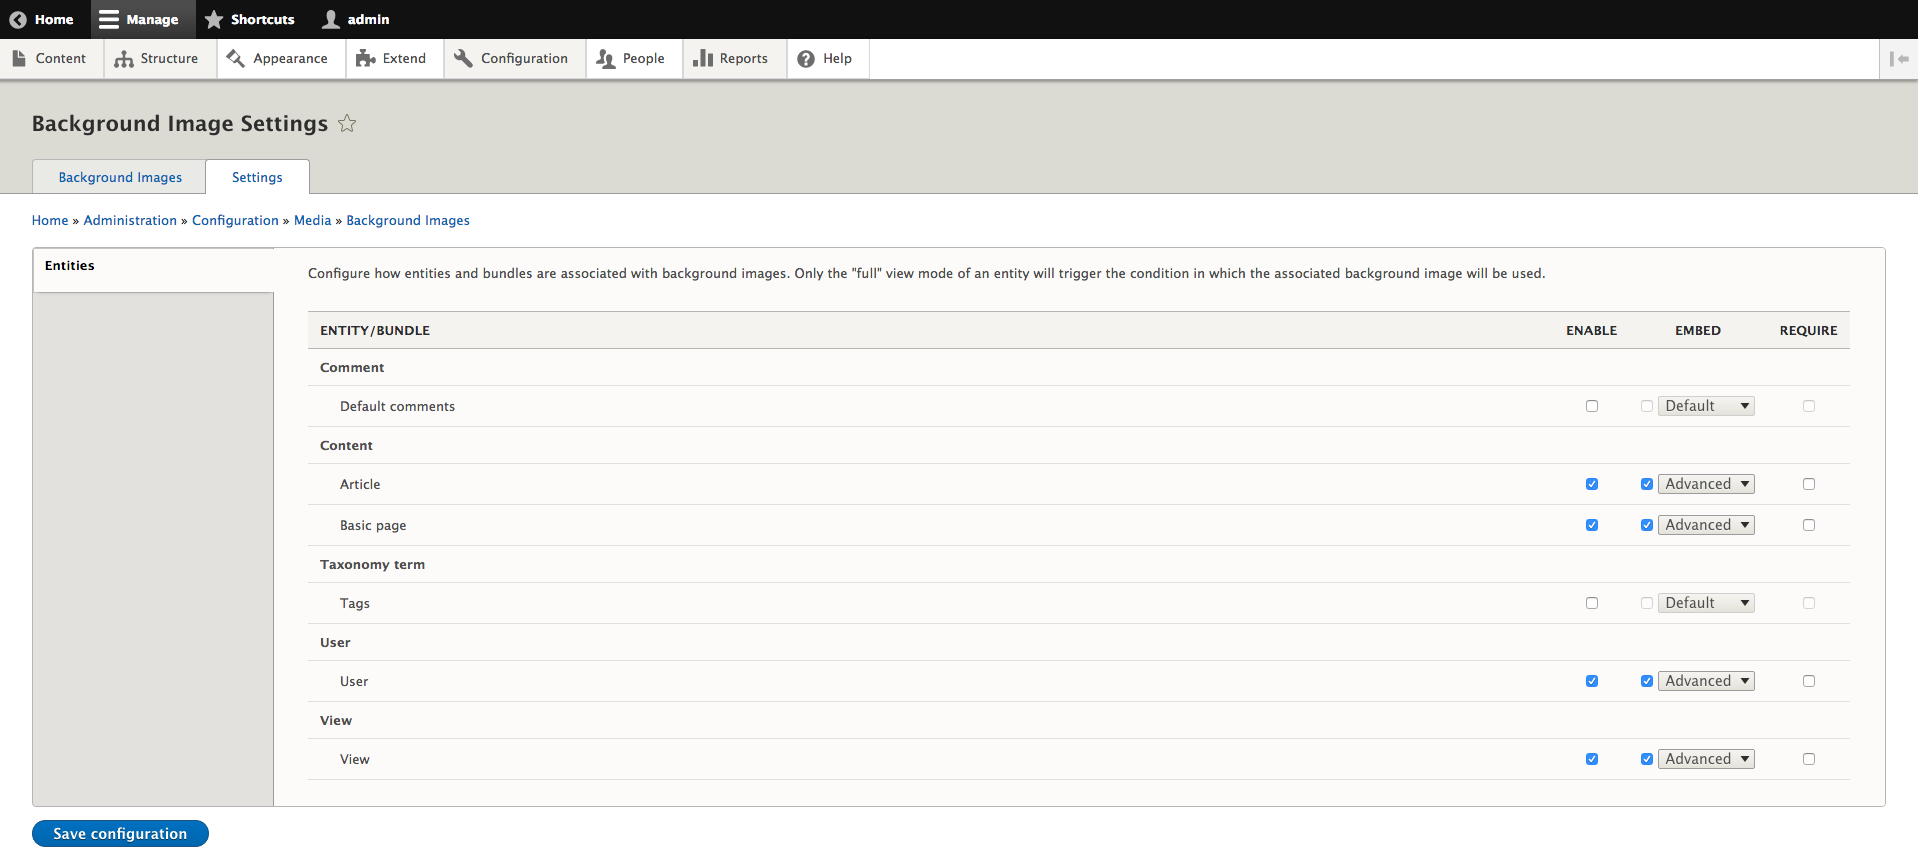
- Enable - Indicates whether this specific entity bundle supports background images at all.
- Embed - Embeds the background image add/edit form inside the specific entity bundle's add/edit form (currently requires the Inline Entity Form module, with plans to remove this soft dependency in the future). The dropdown next to it indicates which "Group" the form is added to. The "Default" group will place it at the bottom of the entire form. The "Advanced" group will place it in the "advanced" group that is present on some entities and some themes may move this to a sidebar (like in Seven).
- Require - Explicitly requires an image of some kind.
- Click
Save configuration.
Step 2: New Region
The Background Image module automatically and dynamically creates a dedicated background_image region in all active themes. This means you don't have to add it to your theme's .info.yml file.
Where you actually render this region is entirely up to you, however it should be noted that this region should be a top level region, positioned outside of all other regions or containers. It should also be positioned somewhere between your header (navigation) and your main content. This is so that when the "full viewport" setting is used, it can push the content (but not the navigation) down out of view.
Once you determine where you want to place this region, alter your theme's page.html.twig file to include the following code so it can actually render this region:
{# Background Image #}
{% block background_image %}
  {% if page.background_image %}
    {{ page.background_image }}
  {% endif %}
{% endblock %}
The following code is from a custom Drupal Bootstrap sub-theme and may give insight into where this region should be placed:
{#
/**
 * @file
 * page.html.twig
 * ...
 */
#}
{% set container = theme.settings.fluid_container ? 'container-fluid' : 'container' %}
{# Navbar #}
{% if page.navigation or page.navigation_collapsible %}
  {% block navbar %}
    {%
      set navbar_classes = [
        'navbar',
        theme.settings.navbar_inverse ? 'navbar-inverse' : 'navbar-default',
        theme.settings.navbar_position ? 'navbar-' ~ theme.settings.navbar_position|clean_class : container,
      ]
    %}
    <header{{ navbar_attributes.addClass(navbar_classes) }} id="navbar" role="banner">
      {% if not navbar_attributes.hasClass(container) %}
        <div class="{{ container }}">
      {% endif %}
      <div class="navbar-header">
        {{ page.navigation }}
        {# .btn-navbar is used as the toggle for collapsed navbar content #}
        {% if page.navigation_collapsible %}
          <button type="button" class="navbar-toggle" data-toggle="collapse" data-target="#navbar-collapse">
            <span class="sr-only">{{ 'Toggle navigation'|t }}</span>
            <span class="icon-bar"></span>
            <span class="icon-bar"></span>
            <span class="icon-bar"></span>
          </button>
        {% endif %}
      </div>

      {# Navigation (collapsible) #}
      {% if page.navigation_collapsible %}
        <div id="navbar-collapse" class="navbar-collapse collapse">
          {{ page.navigation_collapsible }}
        </div>
      {% endif %}
      {% if not navbar_attributes.hasClass(container) %}
        </div>
      {% endif %}
    </header>
  {% endblock %}
{% endif %}

{# Background Image #}
{% block background_image -%}
  {%- if page.background_image -%}
    {{- page.background_image -}}
  {%- endif -%}
{%- endblock %}

{# Main #}
{% block main %}
  <div role="main" class="main-container {{ container }} js-quickedit-main-content">
    <div class="row">

      {# Header #}
      {% if page.header %}
        {% block header %}
          <div class="col-sm-12" role="heading">
            {{ page.header }}
          </div>
        {% endblock %}
      {% endif %}

      {# Sidebar First #}
      {% if page.sidebar_first %}
        {% block sidebar_first %}
          <aside class="col-sm-3" role="complementary">
            {{ page.sidebar_first }}
          </aside>
        {% endblock %}
      {% endif %}

      {# Content #}
      {%
        set content_classes = [
          page.sidebar_first and page.sidebar_second ? 'col-sm-6',
          page.sidebar_first and page.sidebar_second is empty ? 'col-sm-9',
          page.sidebar_second and page.sidebar_first is empty ? 'col-sm-9',
          page.sidebar_first is empty and page.sidebar_second is empty ? 'col-sm-12'
        ]
      %}
      <section{{ content_attributes.addClass(content_classes) }}>

        {# Highlighted #}
        {% if page.highlighted %}
          {% block highlighted %}
            <div class="highlighted">{{ page.highlighted }}</div>
          {% endblock %}
        {% endif %}

        {# Help #}
        {% if page.help %}
          {% block help %}
            {{ page.help }}
          {% endblock %}
        {% endif %}

        {# Content #}
        {% block content %}
          <a id="main-content"></a>
          {{ page.content }}
        {% endblock %}
      </section>

      {# Sidebar Second #}
      {% if page.sidebar_second %}
        {% block sidebar_second %}
          <aside class="col-sm-3" role="complementary">
            {{ page.sidebar_second }}
          </aside>
        {% endblock %}
      {% endif %}
    </div>
  </div>
{% endblock %}

{% if page.footer %}
  {% block footer %}
    <footer class="footer {{ container }}" role="contentinfo">
      {{ page.footer }}
    </footer>
  {% endblock %}
{% endif %}
For customizability, the module does not assume that a background image will always be rendered in the provided background_image region or in which order these elements are rendered in.
Instead, it provides multiple background image based blocks that allow you to control what is displayed and where. The purpose of doing this is two-fold:
- It allows each element of the background image to be cached independently using the various cache contexts that this module provides. This is particularly useful if you "inherit", say, the background image, but only the overlay text has changed. It doesn't invalidate the entire background image and force a new CSS file with this image to be generated.
- Future proofing. Over time, new features will be added, like providing credit/attribution for an image (which is planned), and providing individual blocks for each of these rendering elements will allow features like this to be added in a backwards compatible way without "damaging" existing sites.
page.html.twig template, you will need to clear the cache. You can use drush cr or navigate to /admin/config/development/performance and click Clear all caches: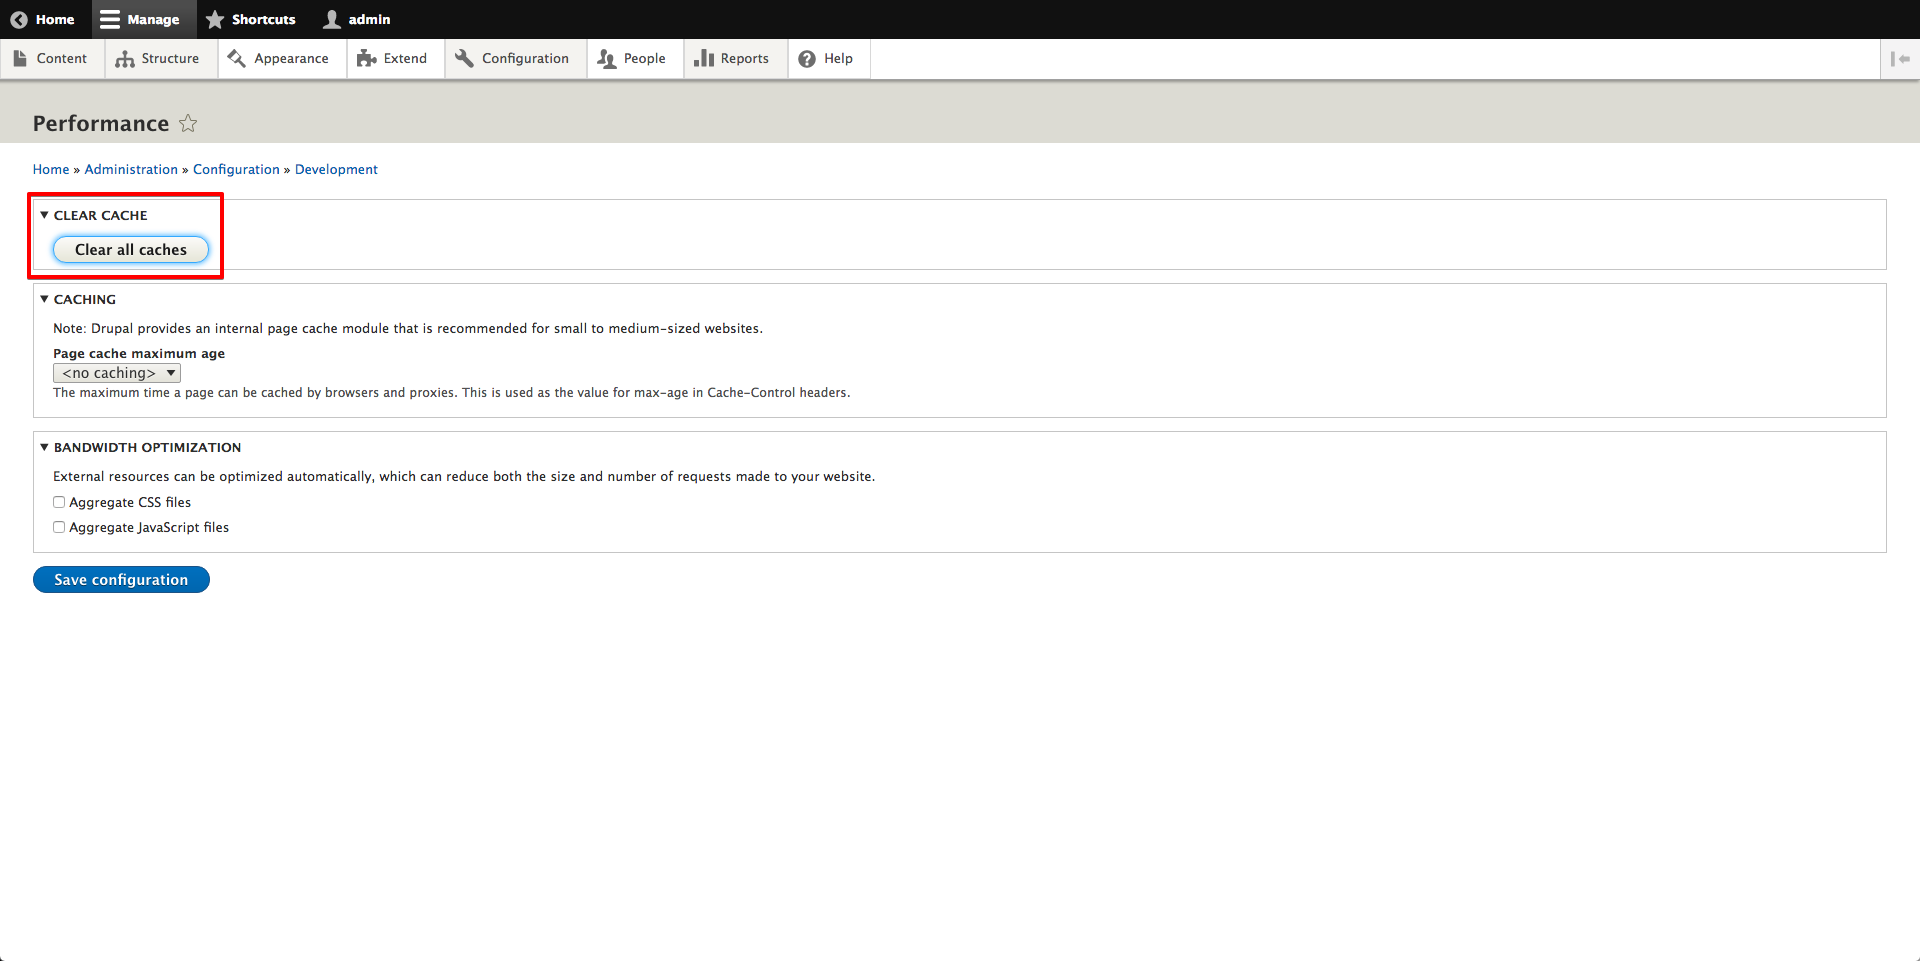
Step 3: Permissions
Navigate to/admin/people/permissions and configure the following permissions: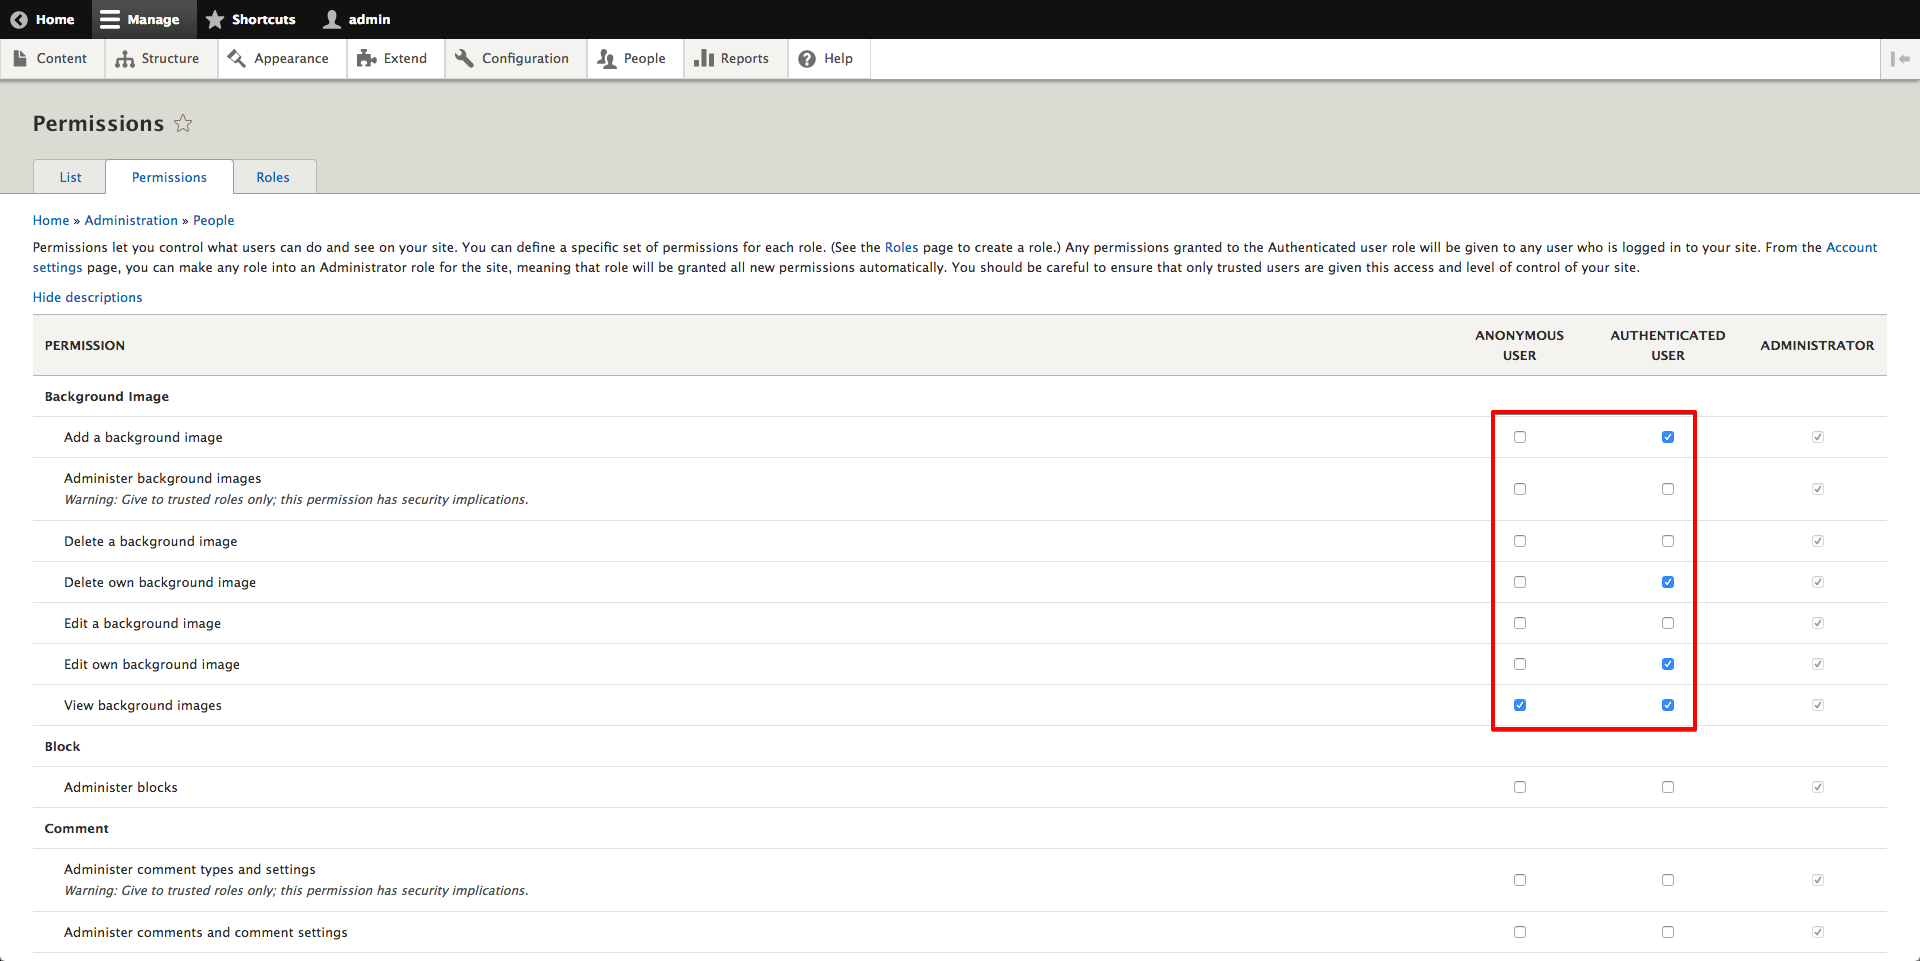
Step 4: Add Blocks
- Navigate to
/admin/structure/blockon your site and click thePlace Blockfor theBackground Imageregion
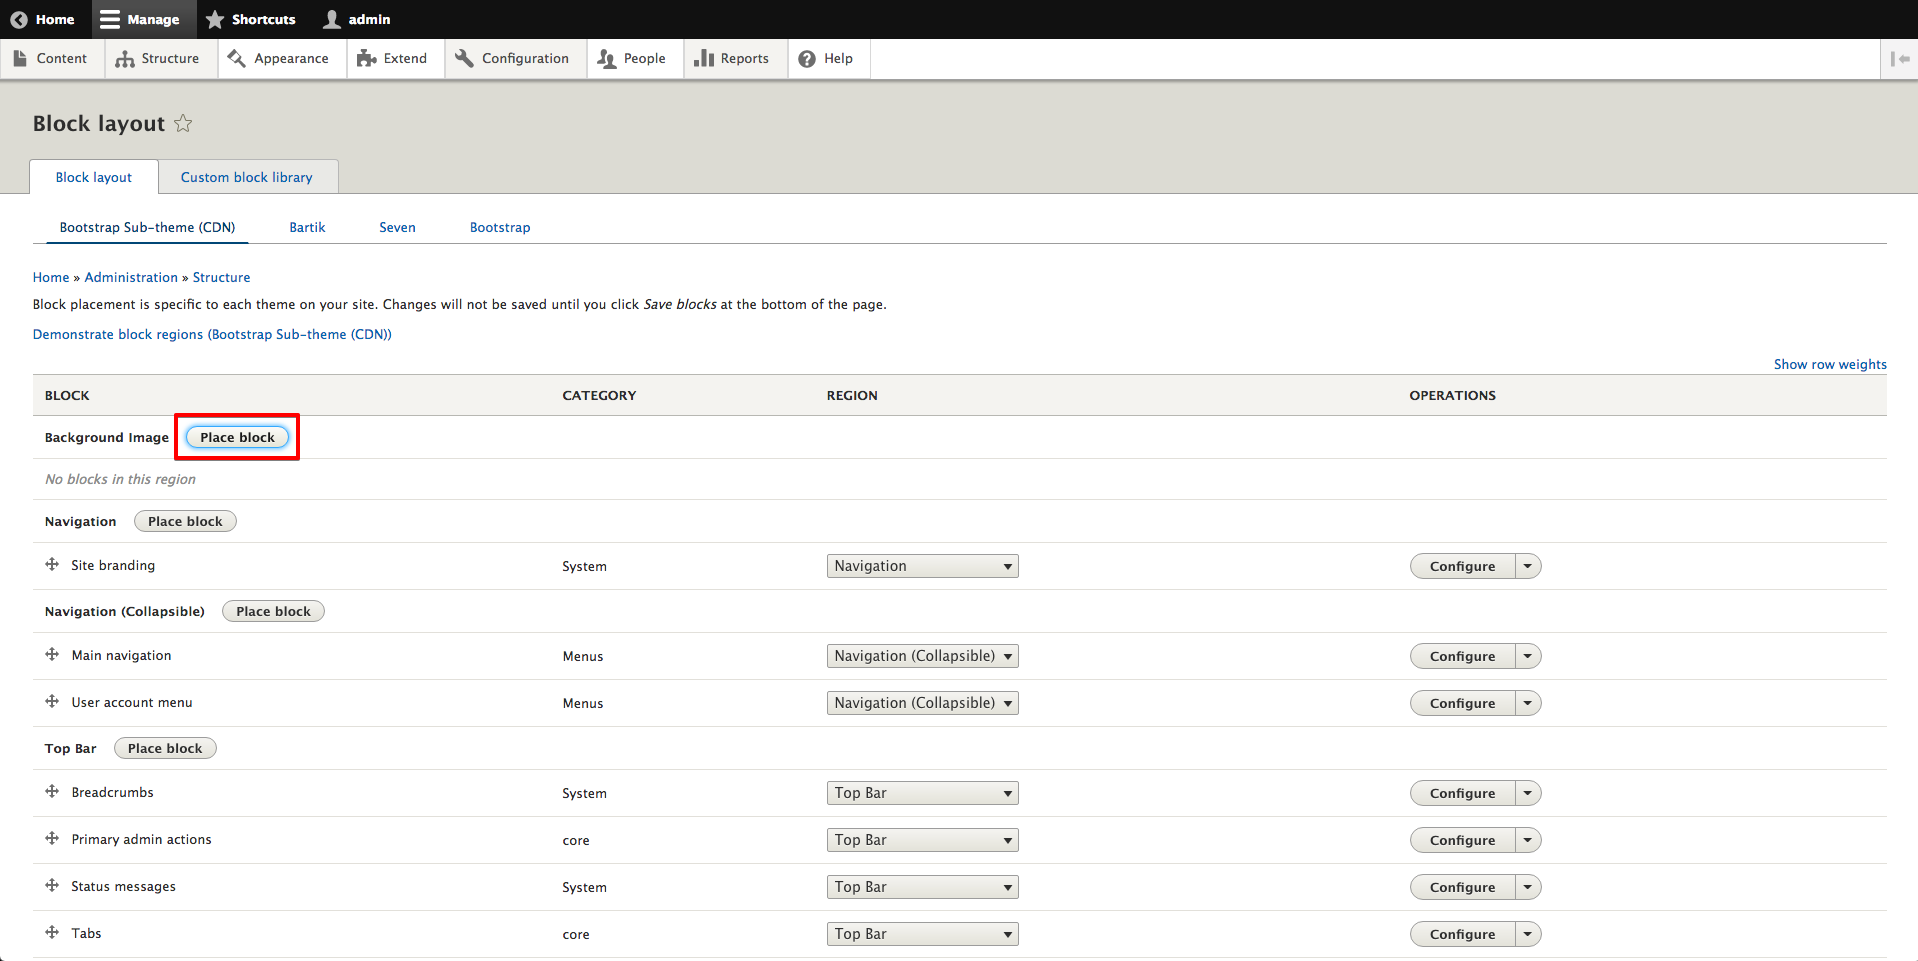
- Add both the
Background ImageandBackground Image - Textblocks:
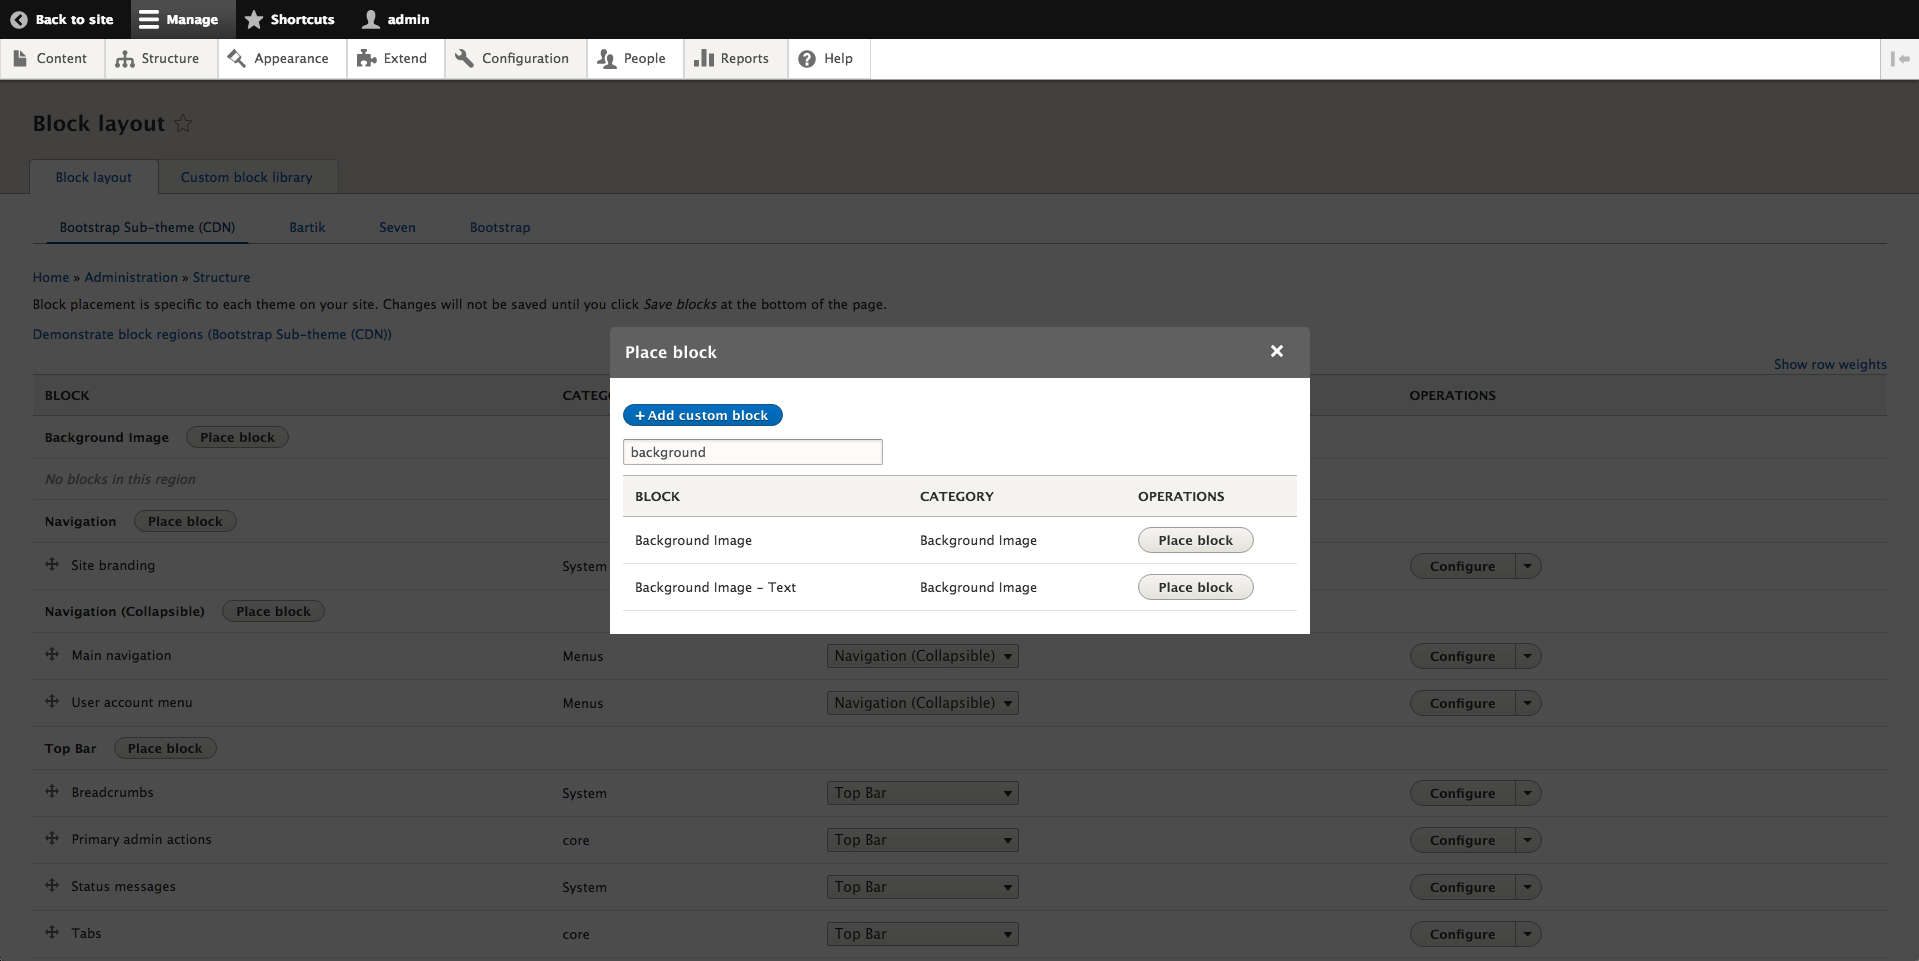
Warning: do not set any of the "Visibility" settings unless you know what you are doing. The Background Image module automatically determines a block's
#accessbased on whether there is a background image for the current request or not.
- Verify that the blocks were added to the
background_imageregion (should look similar to the following):
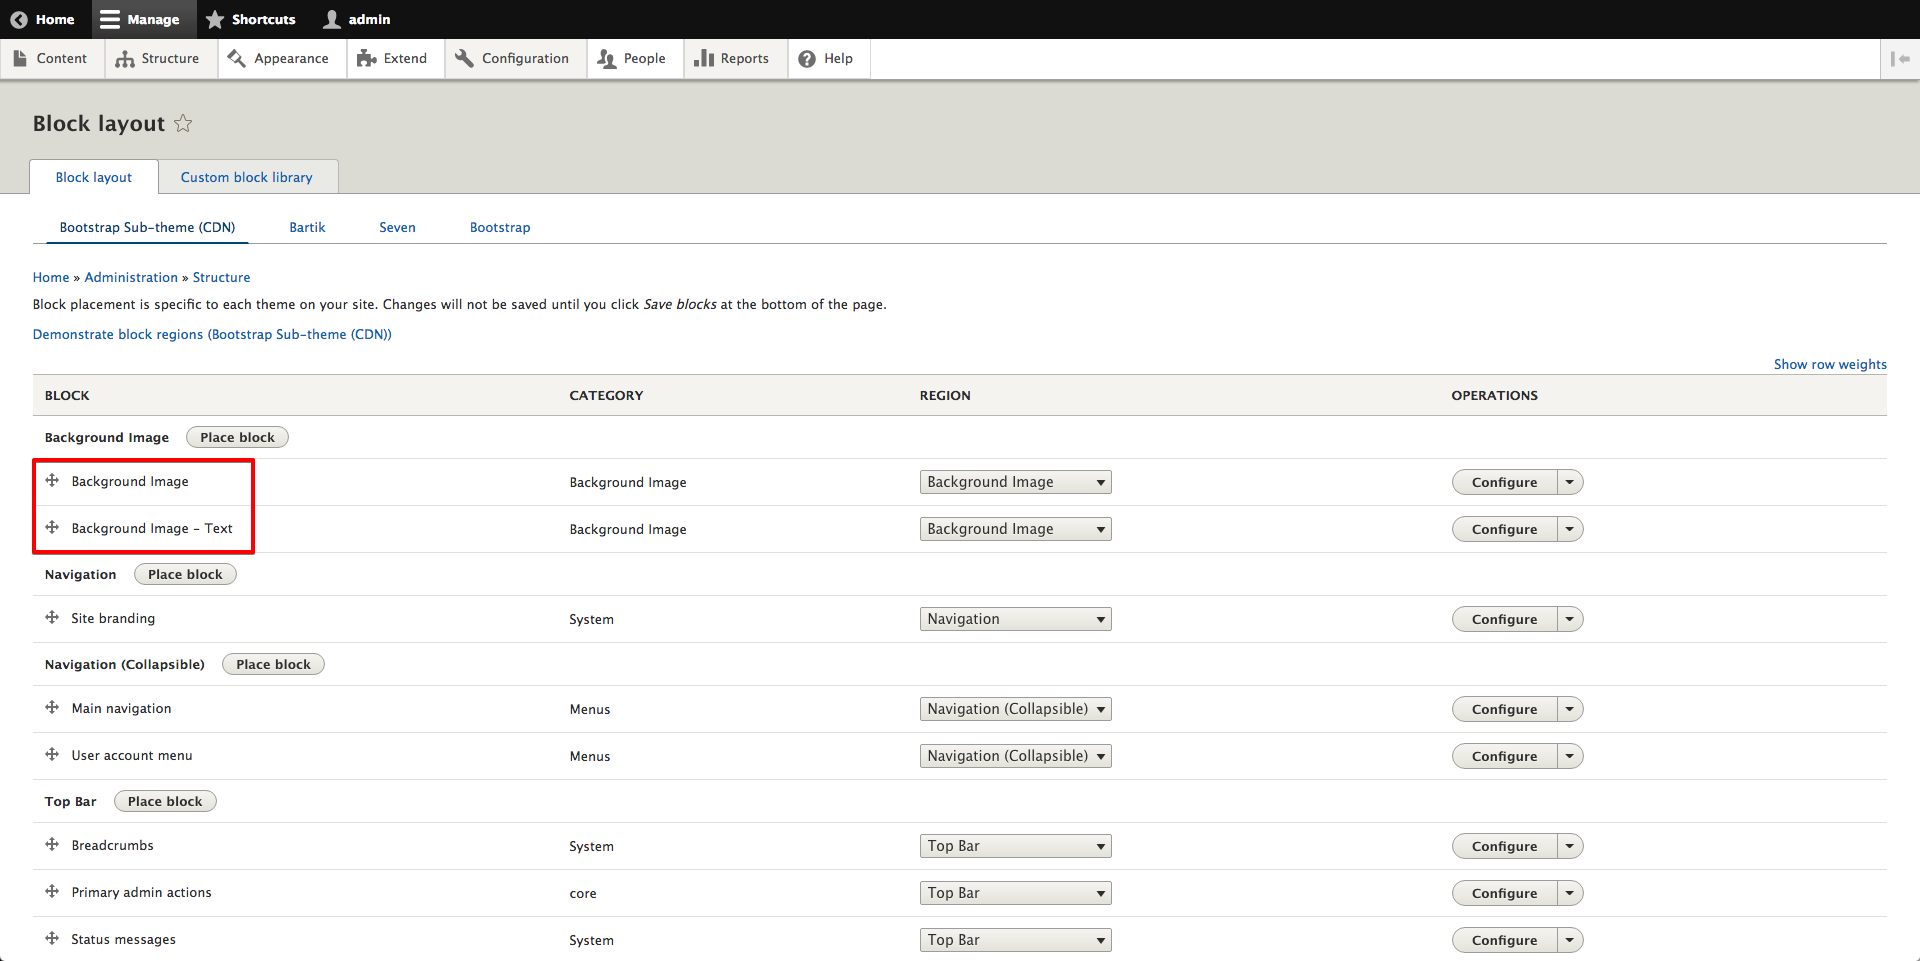
Note: due to how core's config installation of blocks work, this module cannot provide any "default block placement"; you must place these blocks yourself for the module to work properly.
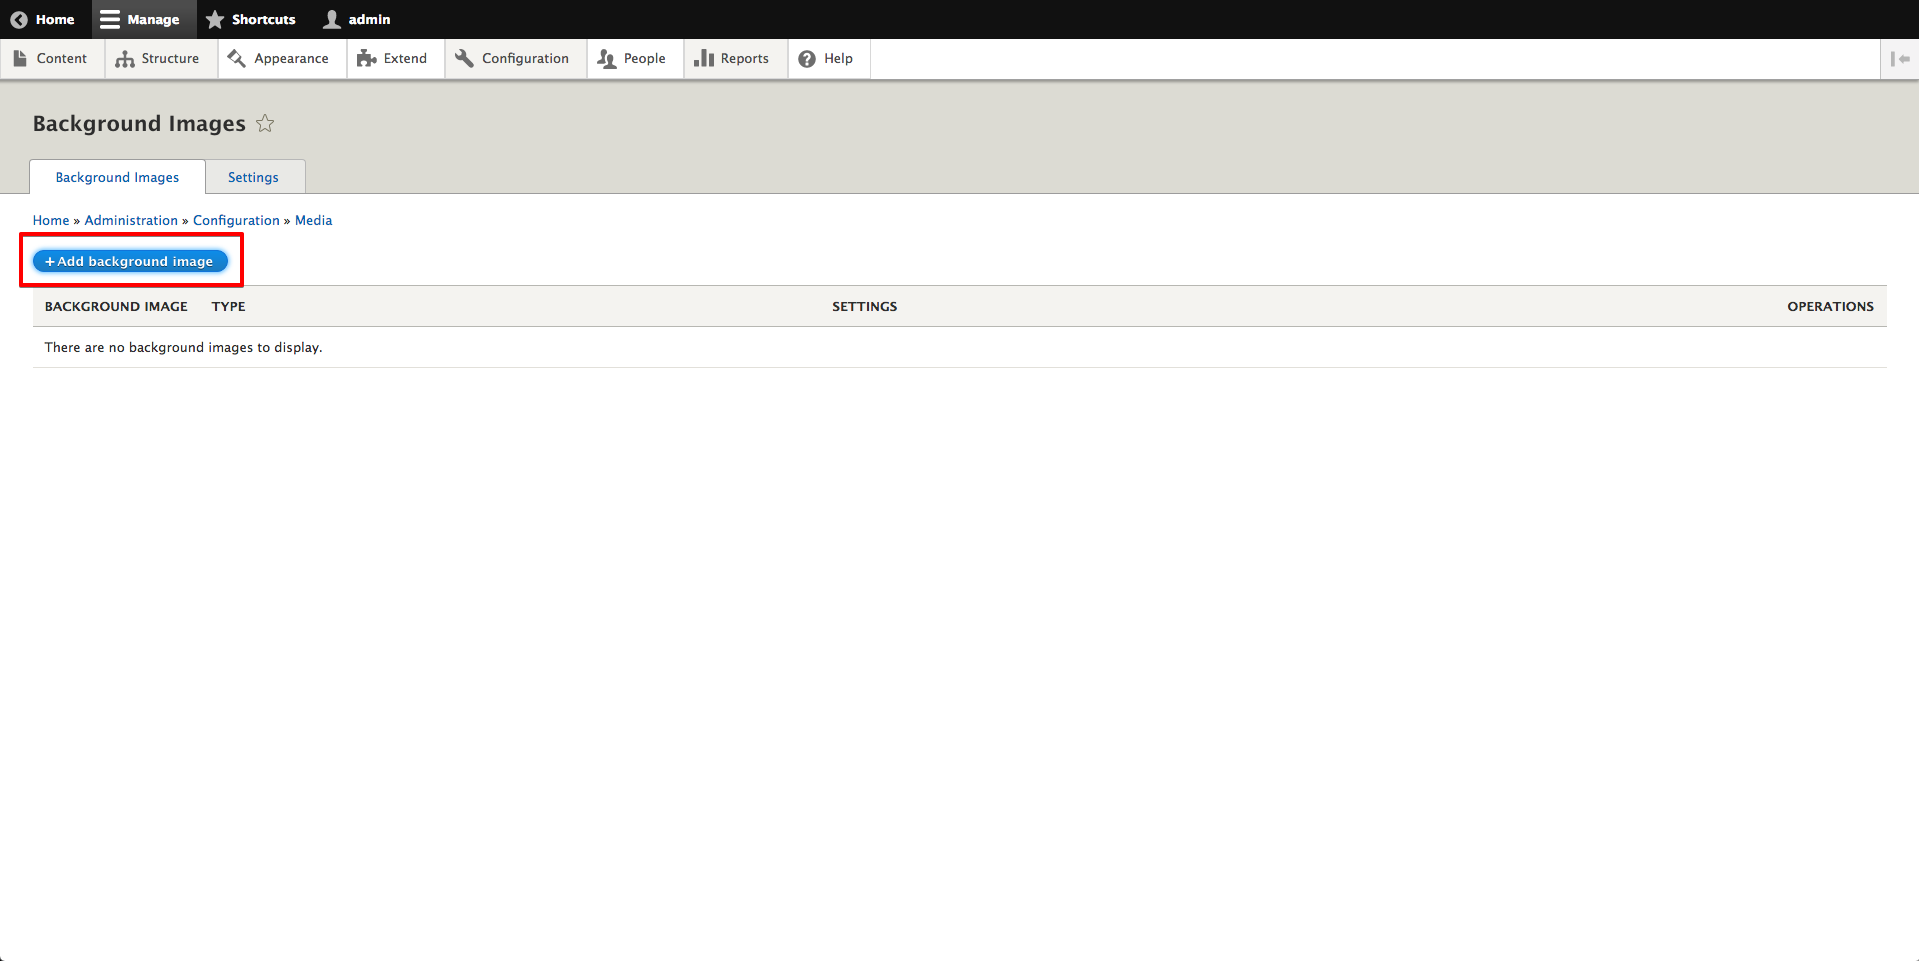
Step 5: Add Global Background Image
- Navigate to
/admin/config/media/background_imageon your site and clickAdd background image:
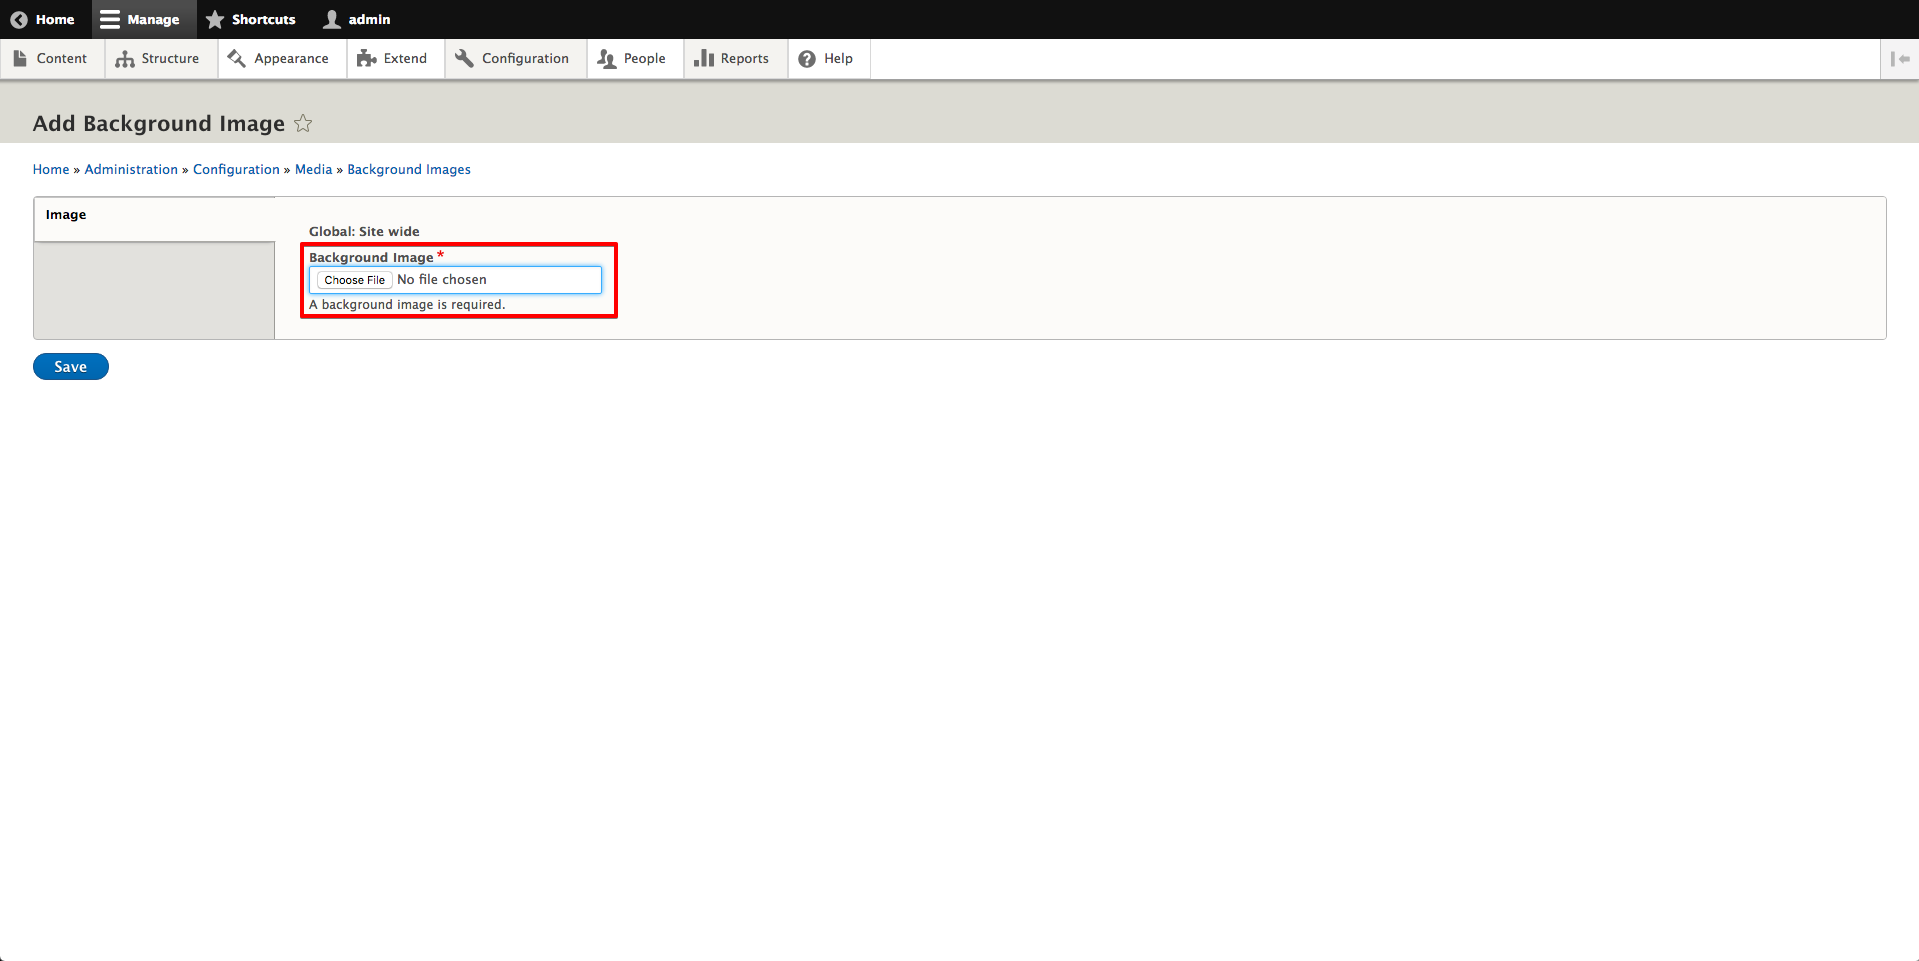
- Enter a label (e.g. "Site wide") for the "Global" background image type and then click
Continue:

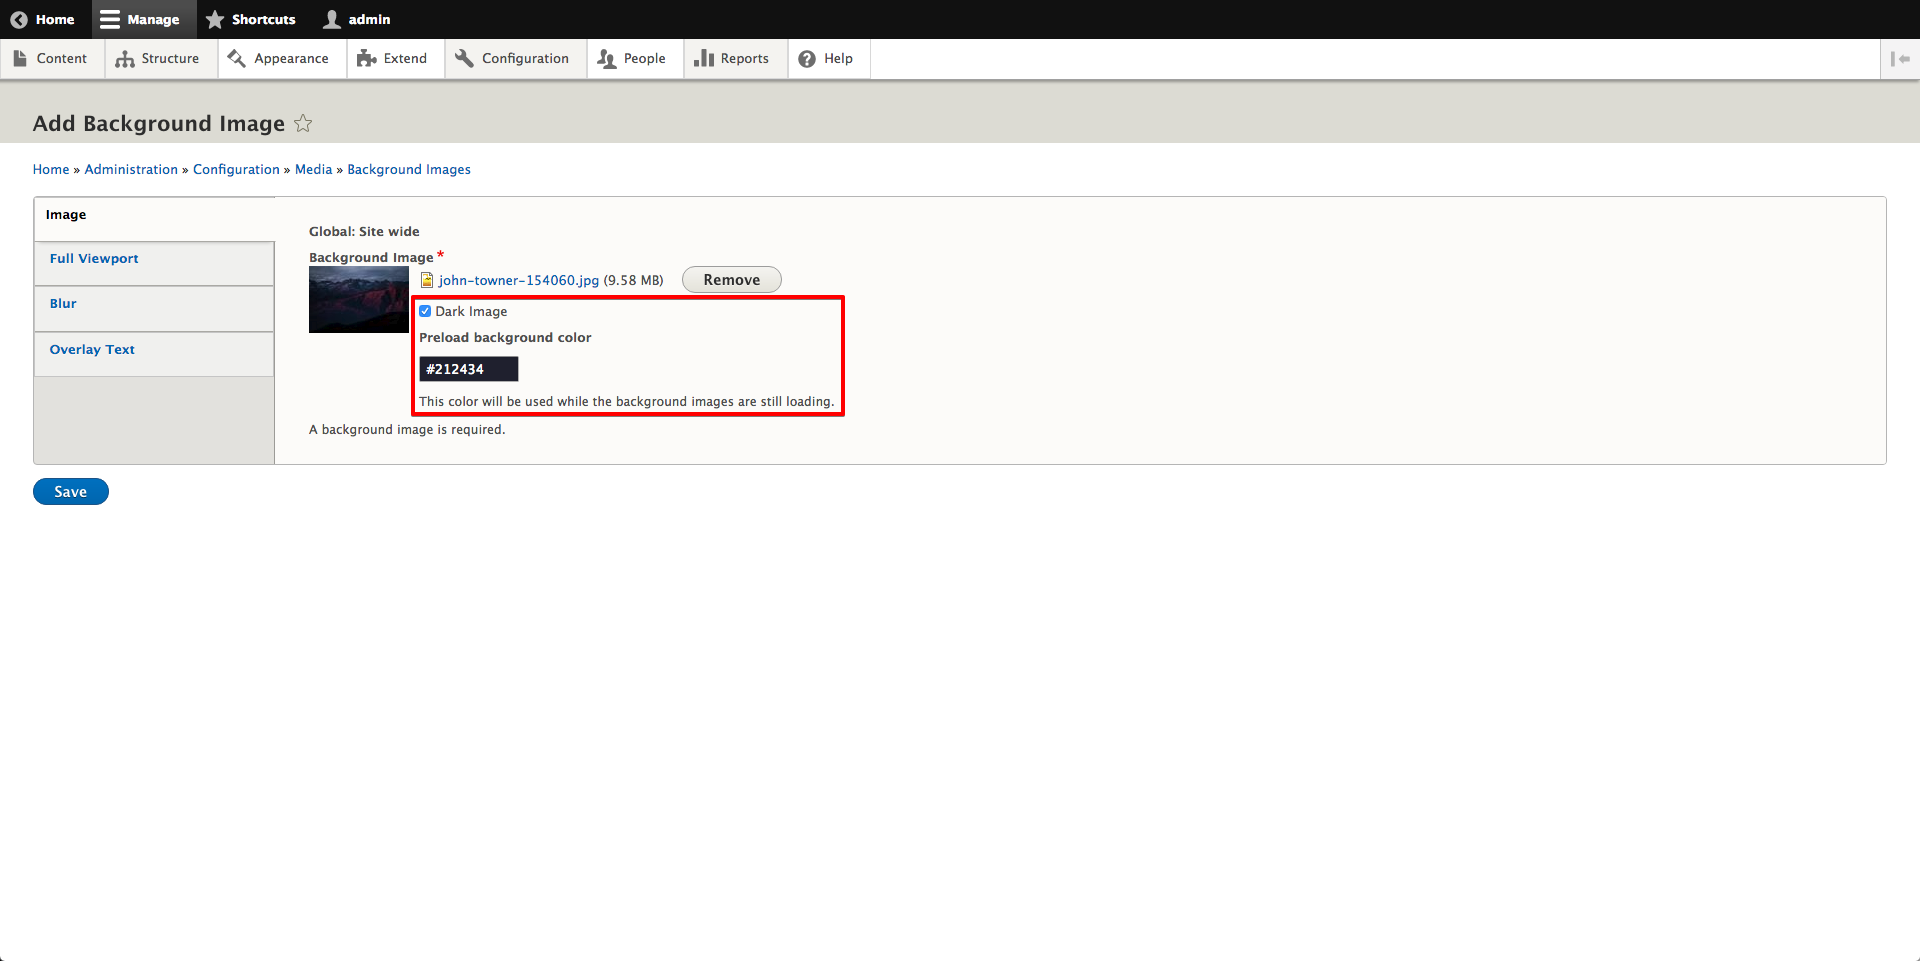
- Select an a background image (I'm going to use https://unsplash.com/photos/JgOeRuGD_Y4 for this example):
- By default, the Background Image module determines if the image is "Dark" based on the preload background color which is calculated from the average color of a 1x1 resize of the image. You can choose to override these default settings here:
- Full Viewport setting:

- Blur settings:
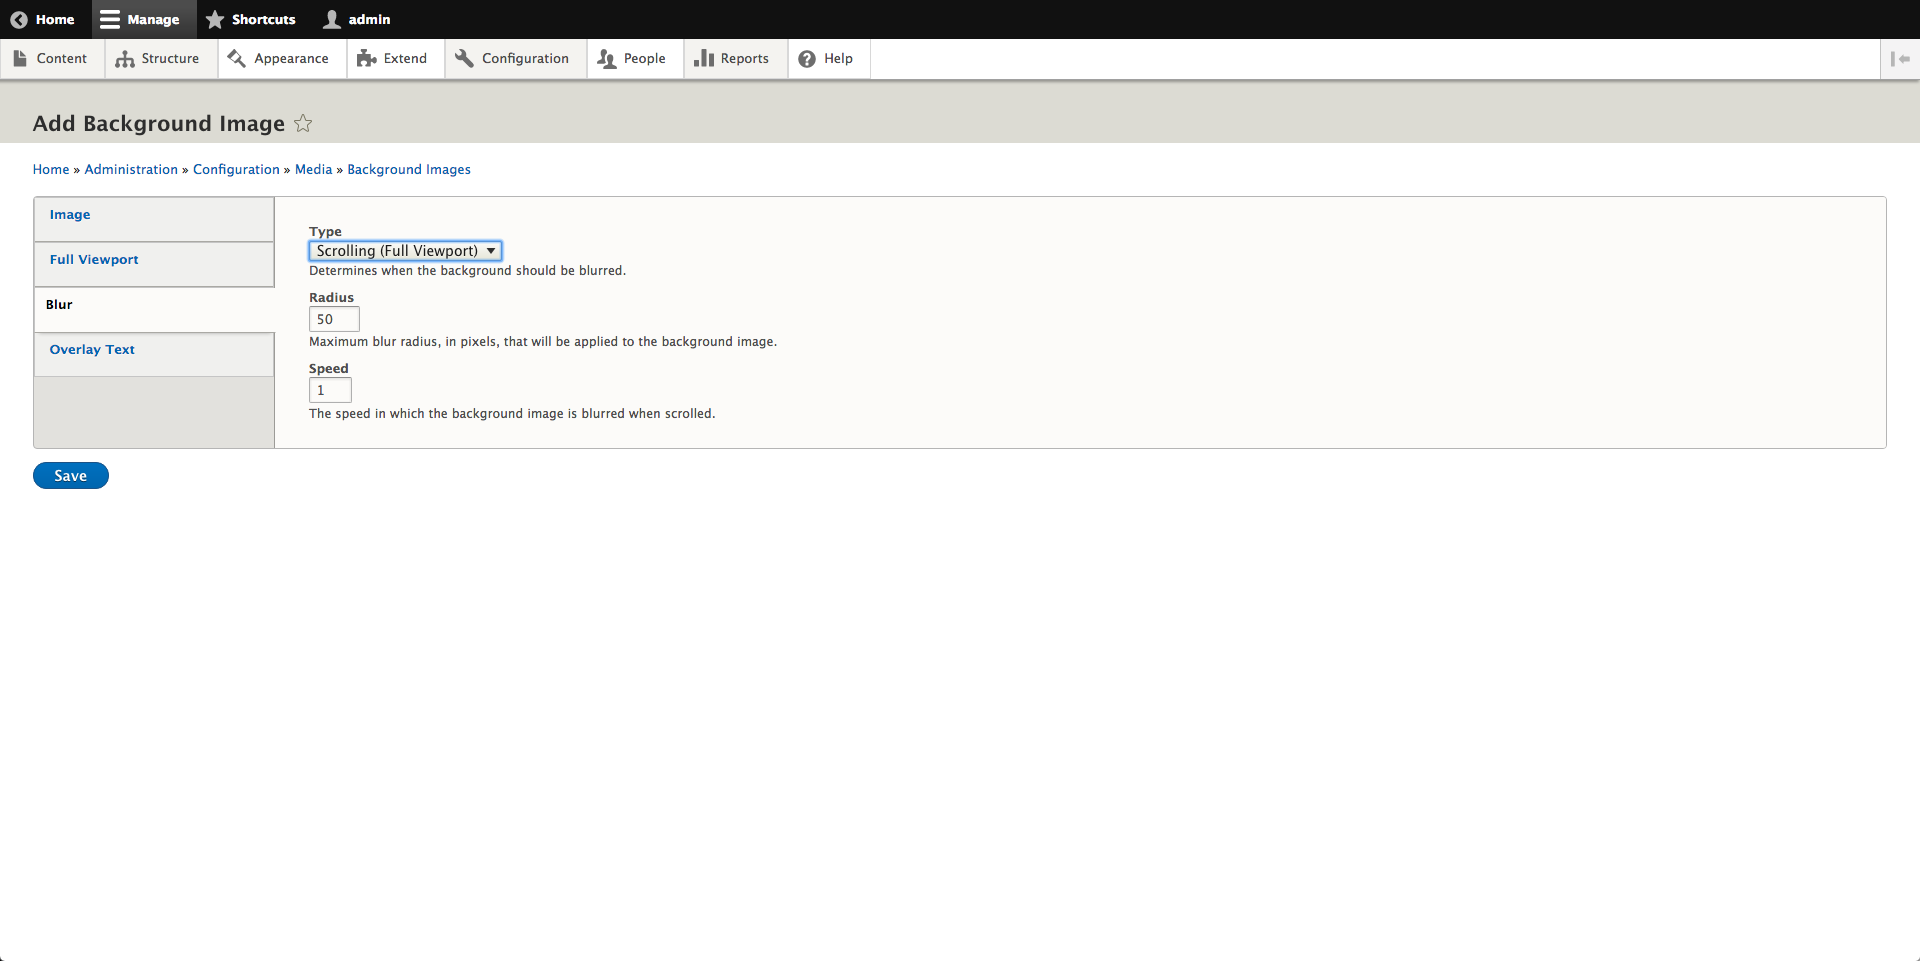
The radius and speed blur settings are pretty self explanatory, but a couple of the blur "type" options need a little extra to help differentiate between the two:
- Scrolling - The current scrolltop determines the radius of the blur (without going over the maximum blur radius). This means that when the scrolltop is 0, the blur is 0.
- Scrolling (Full Viewport) - If the "Full Viewport" setting is enabled, then this will behave like the above. If it's not, then it will behave as if the "Persistent" option was selected.
- Overlay text:
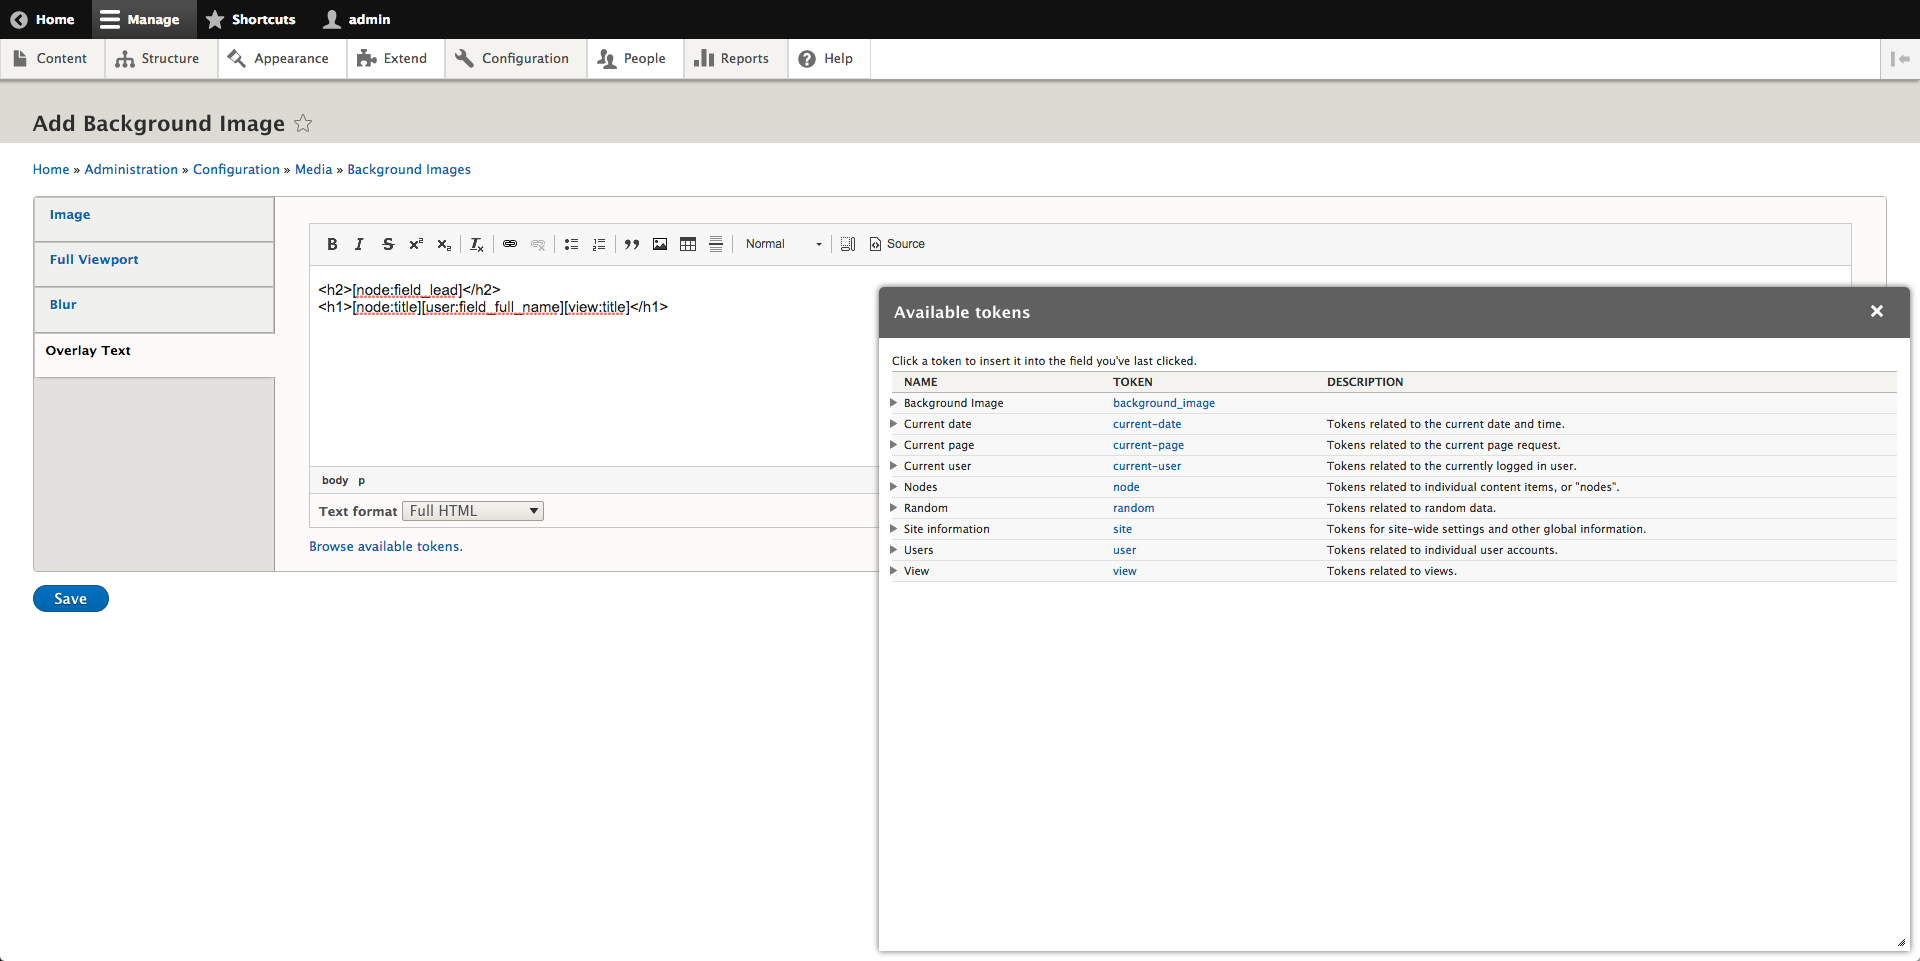
This is formatted text and allows various tokens to be used. You can configure this however you wish, but the following screenshot is how this site's global background image is configured to give an example of just how easy and power this is to use with tokens:
<h2>[node:field_lead]</h2>
<h1>[node:title][user:field_full_name][view:title]</h1>
The first line shows a custom "lead" field that is on each node bundle on our site. This simply allows us to show larger verbiage that doesn't affect the node title. The second line is actually the page title for various entity types (so we can display outside the main content container). By default, if a token doesn't get replaced with a real value, it's removed.
This allows us to use multiple tokens here depending on which entity type is being viewed. Thus, subsequent "child" background images do not actually need to override this value since it automatically inherits this value from the global background image and displays the proper title.
Note: to allow users (or yourself) to view which tokens are available (link that displays a dialog like in the screenshot), you will need to install the Token contrib module.
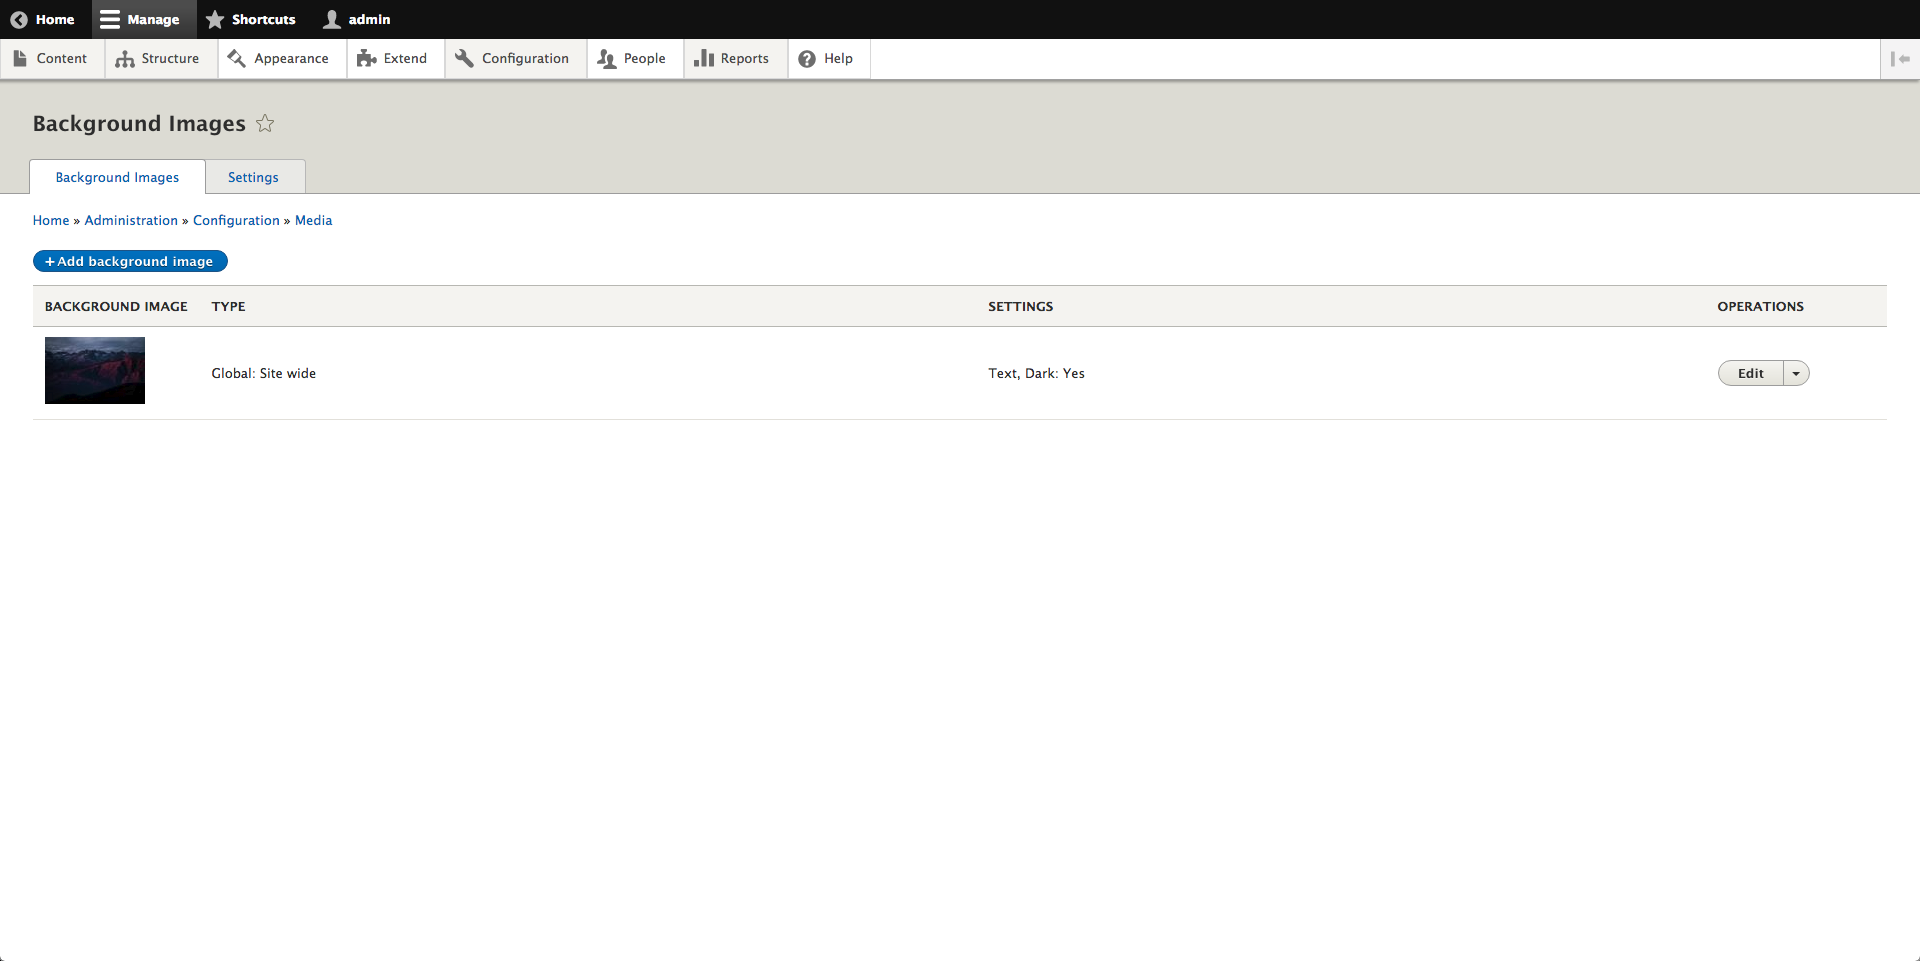
- Once you've configured the global background image, go ahead and click
Save. - You will be redirected back to the background image listing page (
/admin/config/media/background_image) and see the "Global: Site wide" background image you just created:

Step 6: Test
Navigate to your home page, you should see something like the following:Without the "Full Viewport" setting enabled (blurred):
With the "Full Viewport" setting enabled:
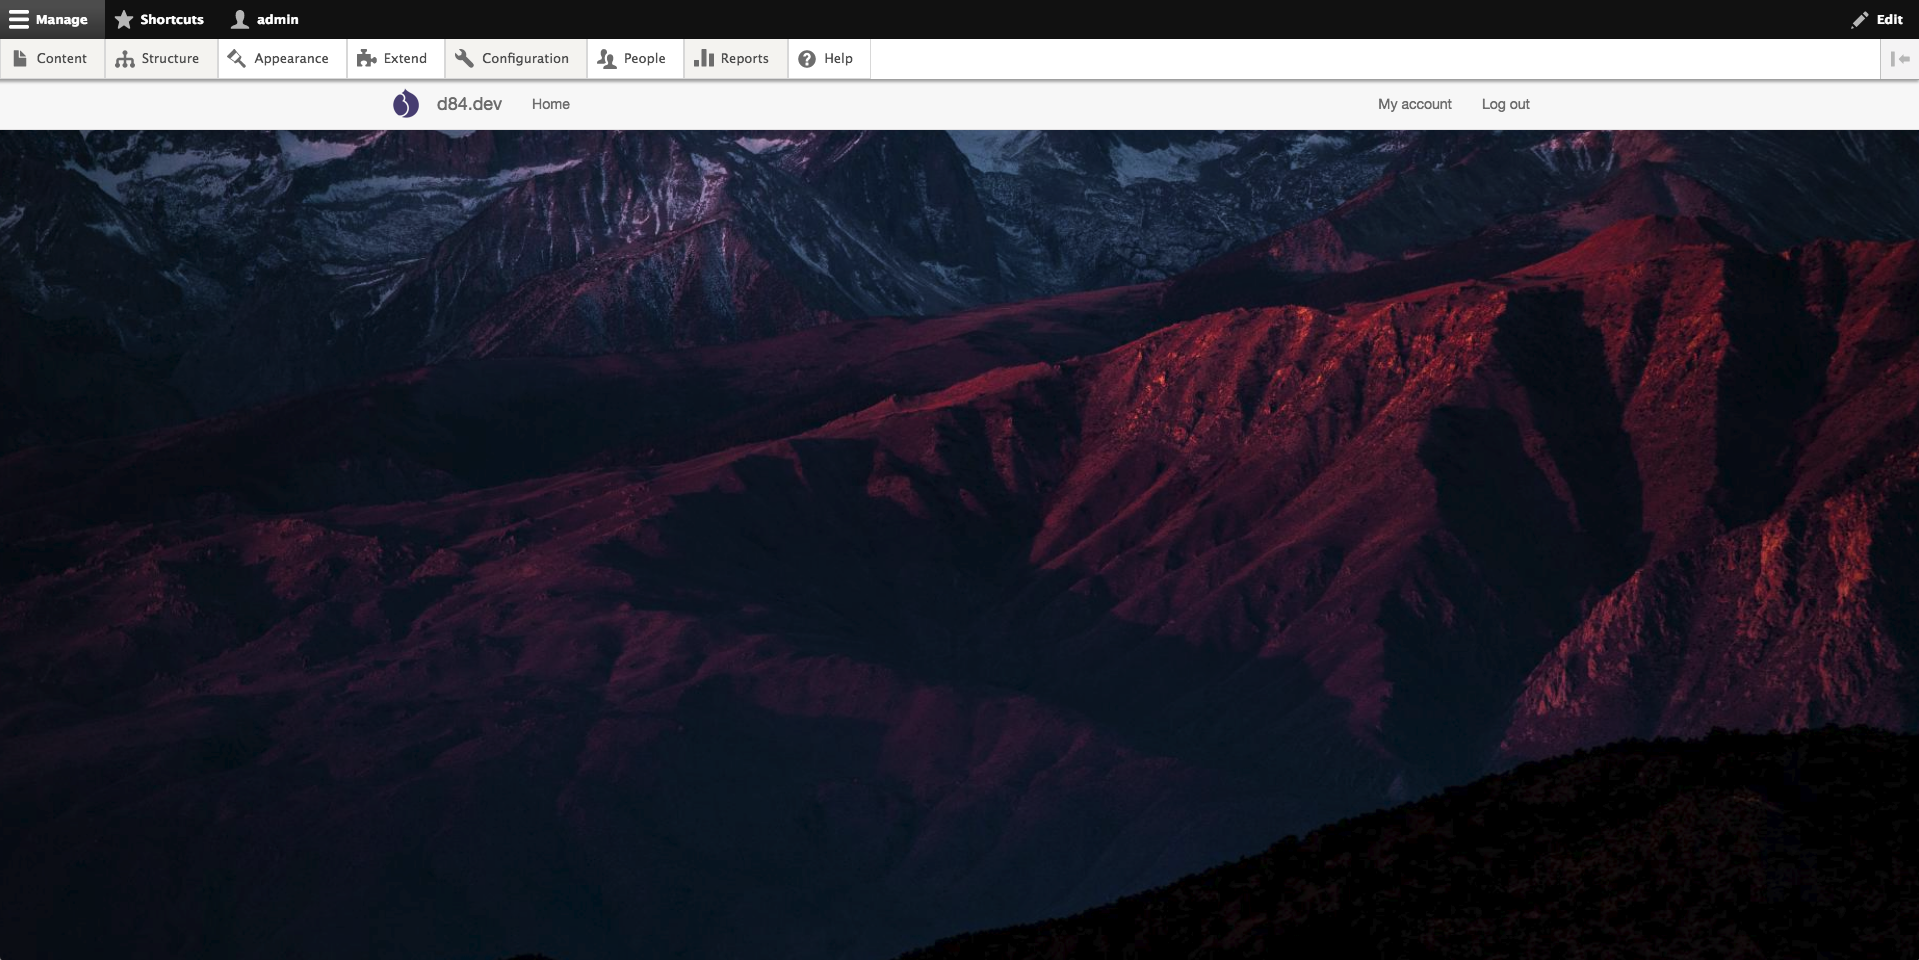
Reminder: this module does not generate stylistic CSS. Your sub-theme is responsible for styling different colors depending on whether an image is "dark" or not. The following screenshots are to prove that this is the "intended behavior" (without sub-theme styling). Please do not open an issue saying that it is "broken"; it's not.
ISO a Unicorn to build your unique theme?
Mark Carver, Drupal Bootstrap maintainer and Senior Frontend Performance Engineer, builds maintainable and responsive Drupal front-ends for Tag1's clients.
Future Roadmap
I really hope that if you've made it this far, you're as excited about this module as I am! I know it doesn't cover every use case and there are likely to be a few things that still need some fine tuning once it has survived its real world debut. Just know that this is just the beginning.
I've already mentioned a few planned features that will make their way into the module, but here are even more ideas that have been floating around in my head while I've been working on it:
- Decouple the soft dependency on the Inline Entity Form module for embedding the Background Image form on other entities.
- More UI based configuration - There's currently a lot of hardcoded config values, but it's all developed in a way that will allow for each config value to be easily configurable from the UI (or manually in a config file). Settings like determining the fallback and preload image styles, which responsive image configuration to use, retina media queries rules, the base CSS class to use, etc.
- Routes and/or Path based background image types
- The ability to credit/attribute the owner of the background image.
- New image effects/filters (like the scrolling blur effect you see here).
- Media API integration (still waiting for the initiative to land in core, in a stable manner).
- And more... submit a feature request!